Intune has a built in feature that collects diagnostics logs, but what if you need to collect a log file very quickly and can’t be bothered to wait? or just some specific file that has nothing to do with intune logging at all?
One way to tackle this is to use a combination of azure storage and a intune remediation script that you execute on demand.
Azure Storage
If you don’t have one already, you need to create a storage account in azure, I made one called tomcruise. remember that the name has to be globally unique.
Once thats done, you need to create a container and give it a name, you can name it anything you want, even a human name like “lior bela” or “lewis barry”, but I chose to use “mycoolfiles”.
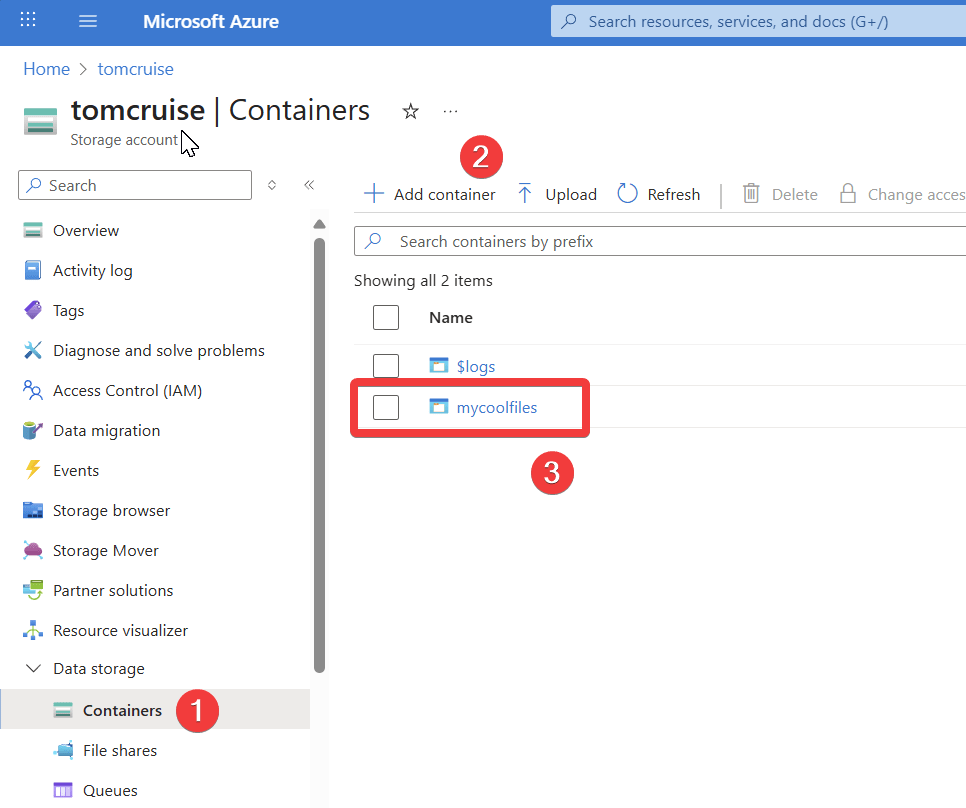
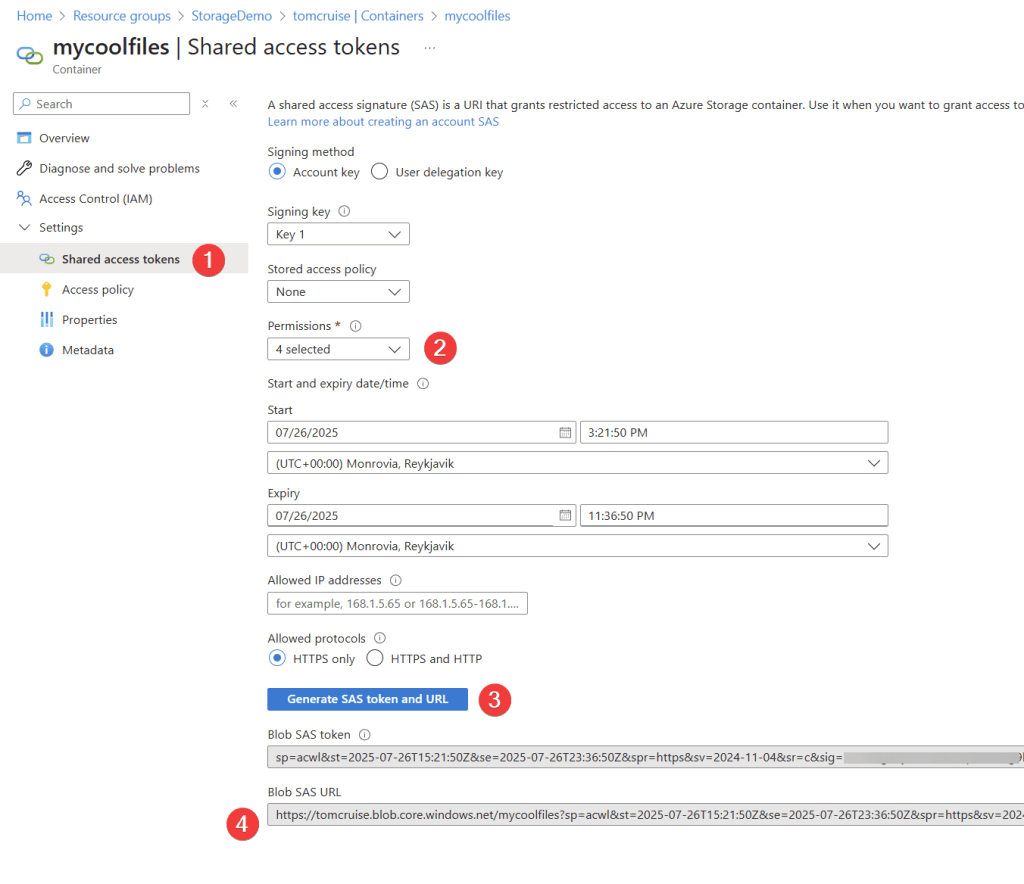
Click on the container you made then generate a shared access token.
- click on shared access tokens
- change the permissions to add, create, write
- click on generate
- copy the URL
Example Code
Lets walk through the basics of how this works, lets use a picture of martin himken as an example.
- Specify your favorite photo of martin himken that you want to upload
- Get the name of the file and put it in a variable, because the shared access token URI must contain a name of the file you upload
- Place the $name variable in the $uri
- You need to configure the headers for the rest method
- put it all together and send it to the cloud!
# (1)
# file you want to upload
$file = 'C:\test\martinHimken.jpg'

# (2)
# when uploading to Azure Blob Storage, the file name is required
# so we extract it from the file path
$name =(Get-Item $file).Name

# (3)
#The target URL with SAS Token
$uri = "https://tomcruise.blob.core.windows.net/mycoolfiles/$($name)?sp=acw&st=2025-07-26T15:37:33Z&se=2025-07-26T23:52:33Z&spr=https&sv=2024-11-04&sr=c&sig=lH8tV%2BR7XZ4ANttIyl%2FgFDod0BbZmXYvbl5o8ftmwM8%3D"

# (4)
#Define required Headers
$headers = @{
    'x-ms-blob-type' = 'BlockBlob'
}

# (5)
# Uploading to cloud!
Invoke-RestMethod -Uri $uri -Method Put -Headers $headers -InFile $file
Most of the code above is pretty simple, the somewhat complicated part is the uri.
the uri you copy from the shared access token creation will look something like this:
https://tomcruise.blob.core.windows.net/mycoolfiles?sp=acw&st=2025-07-26T15:51:50Z&se=2025-07-27T00:06:50Z&spr=https&sv=2024-11-04&sr=c&sig=BtuJ%2B9WVgbFpPGjhwKj2roCeYRetOdHwalF6zbwhNHs%3D
Im not going to blame you if you look at it and think it looks like a random mess, so lets break it up a little.
| https://tomcruise | storage account name, globally unique |
| blob.core.windows.net | azure blob service |
| $($name) | powershell variable that contains the name of the file |
| sp=acw | permissions, in this case A:add, C:create, W:write |
| st=2025-07-26T15:37:33Z | when the token becomes valid |
| se=2025-07-26T23:52:33Z | when the token becomes invalid |
| spr=https | allowed protocols |
| sv=2024-11-04 | SAS token version |
| sr=c | resource type, C stands for container |
| sig=lH8tV%2BR7XZ4ANttIyl%2FgFDod0BbZmXYvbl5o8ftmwM8%3D | the signature thats used to authenticate to the storage |
You have already noticed that the various options in the shared access signature settings will change the URL.
Here for example is a URL where all the permission options have been enabled and a allowed IP address was added.
https://tomcruise.blob.core.windows.net/mycoolfiles?sp=racwdli&st=2025-07-26T20:52:14Z&se=2025-07-27T01:07:14Z&sip=192.123.123.123&sv=2024-11-04&sr=c&sig=Je7hTZ9nE4haopsA23i7jLd4ZZPVv8WN9K0OQc4j%2F%2Bw%3D
Variable in the URI
But whats up with the powershell variable in the URI in the above example? it is essentially the destination for the file, but it has to be named otherwise the file goes nowhere.
https://tomcruise.blob.core.windows.net/mycoolfiles/$($name)
This can be explained as a postal deliver address.
| blob.core.windows.net | the country |
| tomcruise.blob.core.windows.net | the city |
| https://tomcruise.blob.core.windows.net/mycoolfiles | the street |
| https://tomcruise.blob.core.windows.net/mycoolfiles/$($name) | and then finally your house address |
A Few Practical Examples
Thats enough technobabble, lets get to the real meat and potato’s of this post and look at some examples.
Collect a single file
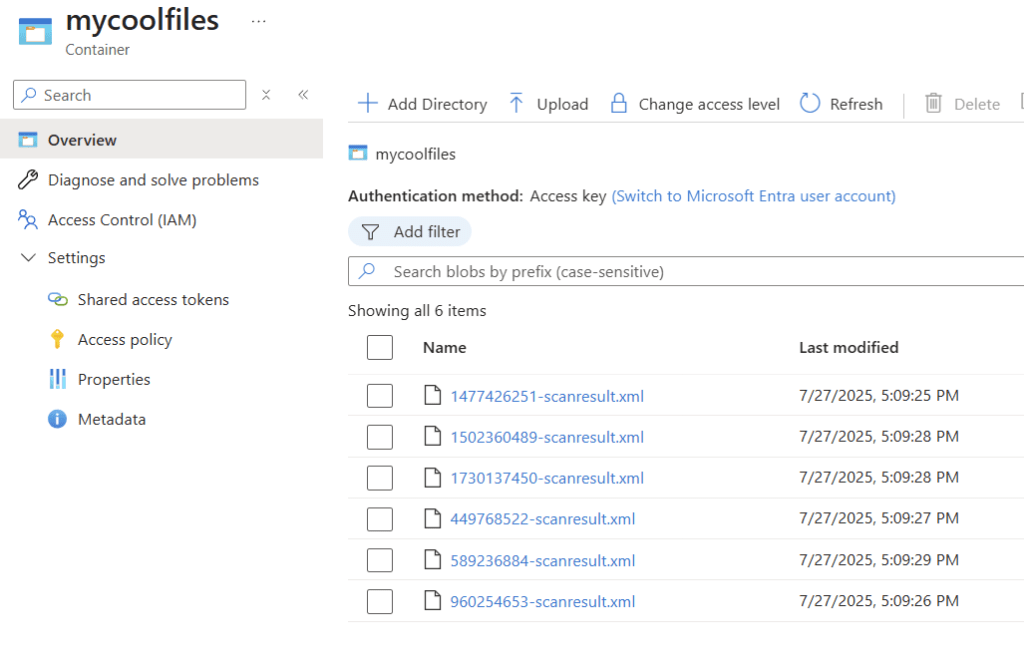
If a feature update fails to start on a windows device, you can collect the scanresult file to see what happened.
Because this example uploads the scanresult.xml file into the “mycoolfiles” directory, im appending appending the device hostname to the filename. to keep the files distinct and easier to find.
# if the feature upgrade failed, the scanresult.xml will contain more details
$file = 'c:\$WINDOWS.~BT\sources\panther\scanresult.xml'

# add the device hostname to the file name
# This is to ensure that the file name is unique and can be easily identified
$name = $env:COMPUTERNAME + " - " +  (Get-Item $file).Name

#The target URL with SAS Token
$uri = "https://tomcruise.blob.core.windows.net/mycoolfiles/$($name)?sp=acw&st=2025-07-26T15:37:33Z&se=2025-07-26T23:52:33Z&spr=https&sv=2024-11-04&sr=c&sig=lH8tV%2BR7XZ4ANttIyl%2FgFDod0BbZmXYvbl5o8ftmwM8%3D"

#Define required Headers
$headers = @{
    'x-ms-blob-type' = 'BlockBlob'
}

#Upload File...
Invoke-RestMethod -Uri $uri -Method Put -Headers $headers -InFile $file
Collect a file, but put it in its own directory
Kinda the same as above, but instead of appending the hostname to the filename, im creating a directory for each hostname and putting there file in there.
$file = 'c:\temp\rudyooms.dll'

# this is used so the file gets uploaded to a directory that has the same name as the computer the files originated from
$hostname = $env:computername

# This is to ensure that the file name is unique and can be easily identified
$name = (Get-Item $file).Name

#The target URL with SAS Token
$uri = "https://tomcruise.blob.core.windows.net/mycoolfiles/$hostname/$($name)?sp=acw&st=2025-07-26T15:37:33Z&se=2025-07-26T23:52:33Z&spr=https&sv=2024-11-04&sr=c&sig=lH8tV%2BR7XZ4ANttIyl%2FgFDod0BbZmXYvbl5o8ftmwM8%3D"

#Define required Headers
$headers = @{
    'x-ms-blob-type' = 'BlockBlob'
}

#Upload File...
Invoke-RestMethod -Uri $uri -Method Put -Headers $headers -InFile $file
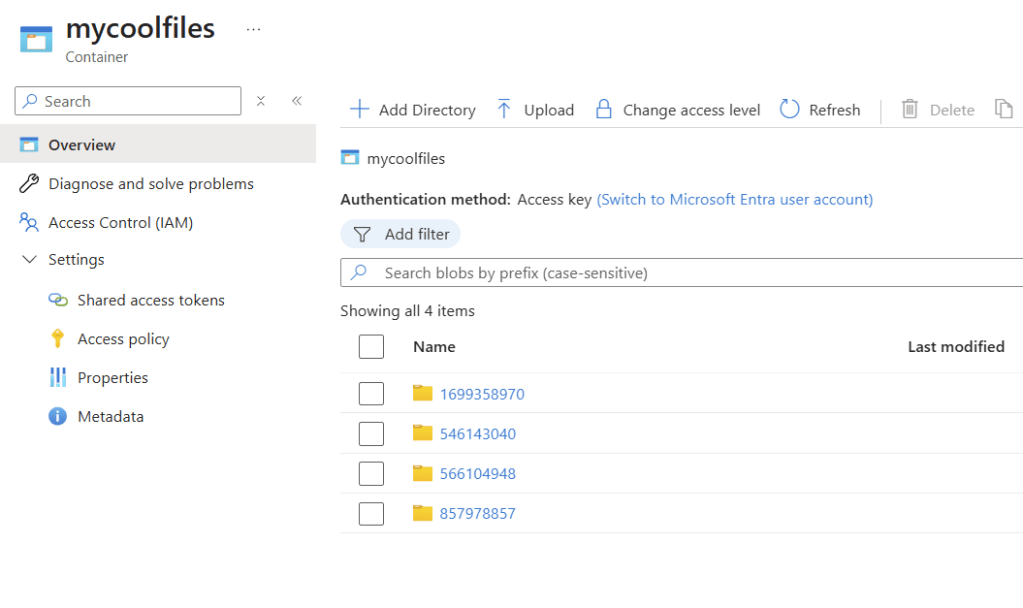
A directory for each hostname that the script ran on, neato burrito!
Multiple files
What if you need to collect a bunch of files? for example Blue Screen of death dumpfiles from c:\windows\minidump or my collection of photos of martin.
Lets start with handy function that makes dealing with this a little easier.
# a simple function to upload a file to Azure Blob Storage using REST API
function Upload-BlobFile {
    [CmdletBinding()]
    param (
        [Parameter(Mandatory = $true)]
        [string]$StorageAccount,
        [Parameter(Mandatory = $true)]
        [string]$ContainerName,
        [Parameter(Mandatory = $true)]
        [string]$BlobSAStoken,
        [Parameter(Mandatory = $true)]
        [string]$FilePath,
        [string]$Directory
    )

    $name = (Get-Item $FilePath).Name

    # If Directory is not specified, use the root of the container
    if ([string]::IsNullOrWhiteSpace($Directory)) {
        $blobPath = "$ContainerName/$name"
    } else {
        $blobPath = "$ContainerName/$Directory/$name"
    }

    $URI = "$StorageAccount$blobPath`?$BlobSAStoken"

    $headers = @{
        'x-ms-blob-type' = 'BlockBlob'
    }

    Write-Verbose "Uploading file '$FilePath' to blob '$blobPath' at URI '$URI'"

    Invoke-RestMethod -Uri $URI -Method Put -Headers $headers -InFile $FilePath
}
And here is an example how its used.
# Example usage of the Upload-BlobFile function
$files = Get-ChildItem -Path "C:\test" -File
# Loop through each file in the specified directory
foreach ($file in $files) {
# Define parameters for the functions, using a splat operator to pass the parameters
$params = @{
# note that the StorageAccount URL must end with a slash
StorageAccount = "https://tomcruise.blob.core.windows.net/"
ContainerName = "mycoolfiles"
BlobSAStoken = "sp=acw&st=2025-07-27T20:08:53Z&se=2025-07-28T04:23:53Z&spr=https&sv=2024-11-04&sr=c&sig=JEHZzL4Xh802YyiEuREGSFufj9hMjBecCZoemIoGyjA%3D"
FilePath = $file.FullName
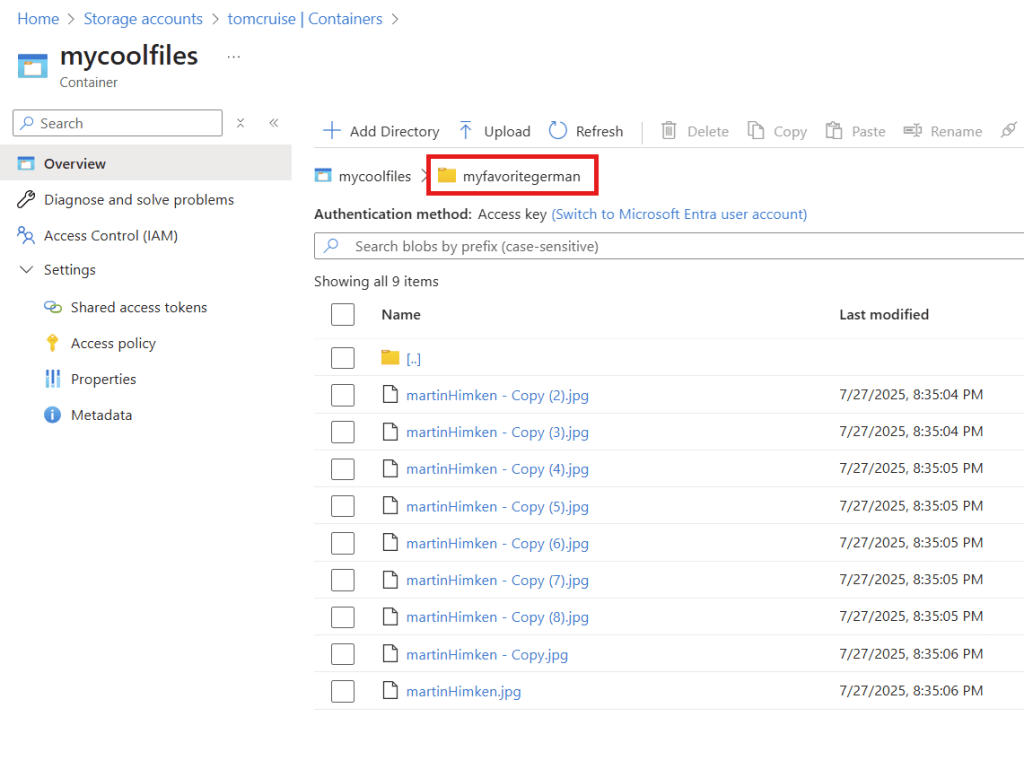
Directory = "myfavoritegerman"
}
# call the function with the parameters
Upload-BlobFile @params -Verbose
}
All the files from c:\test got uoloaded to the “myfavoritegerman” directory in my azure storage account
Intune
Create a new remediation script in intune.
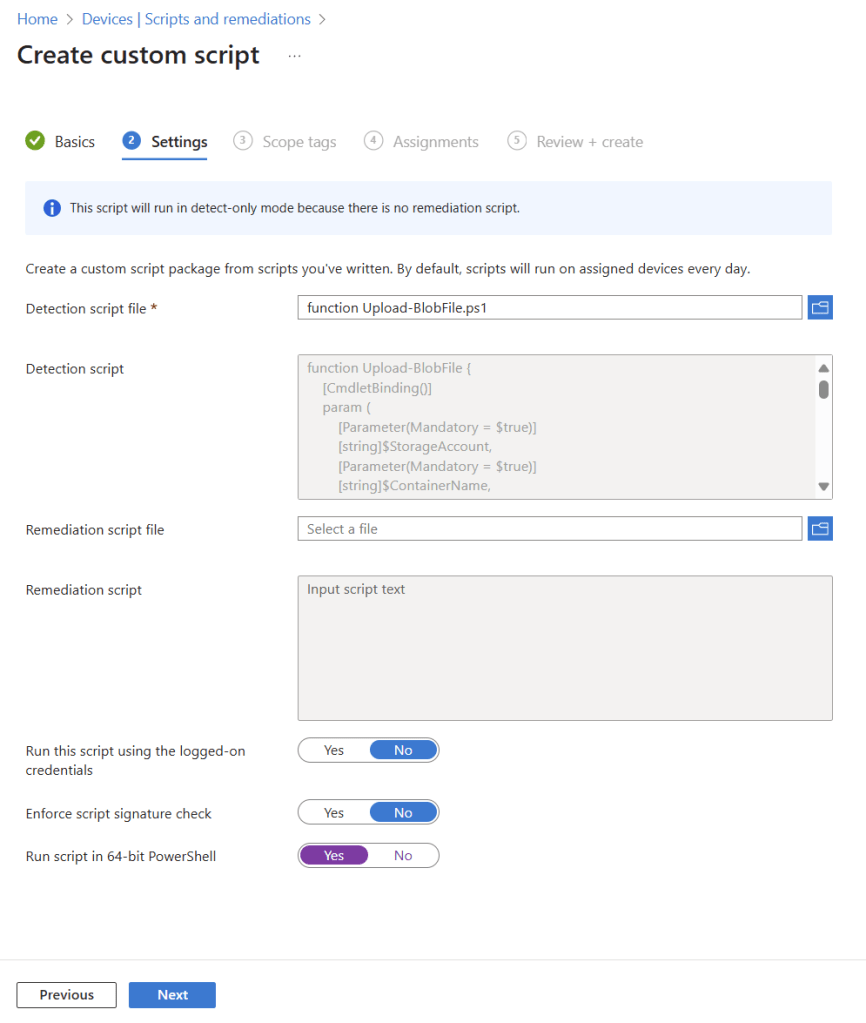
Since this is just collecting files on demand, there is no reason to use a combination of detection and remediation script. you can just put the whole script into the detection.
When you initiate a on-demand remediation script, the files should appear in your storage account within a minute, usually 10 seconds. WAAAAYY faster than the diagnostics collection.

Leave a comment