Intro
I’ve always found that the best way to learn about a feature is by having a valid use case for that feature.
Azure tables has been on my radar for years, but I didn’t know what to do with it, that is until Hailey Phillips barged into my office and said:
I need a list of Windows devices that have a Dell 2007FP monitor manufactured in 2008, on my desk first thing in the morning, get it on double quick!
Who was I to argue?
The Problem
Since we are a cloud native company and Intune doesn’t collect any information about the monitors that are connected to your endpoint, I found myself in a bit of a pickle.
Lets start with powershell
First I needed to figure out if this data was even possible to collect, after a bit of googling I found wmi class called WmiMonitorID
Get-CimInstance -Query "Select * FROM WMIMonitorID" -Namespace root\wmi
Which provided this information
Active                 : True
InstanceName           : DISPLAY\AUO6092\4&27e12916&0&UID8388688_0
ManufacturerName       : {65, 85, 79, 0...}
ProductCodeID          : {54, 48, 57, 50...}
SerialNumberID         : {48, 0, 0, 0...}
UserFriendlyName       :
UserFriendlyNameLength : 0
WeekOfManufacture      : 39
YearOfManufacture      : 2021
PSComputerName         :

Active                 : True
InstanceName           : DISPLAY\DELA124\4&27e12916&0&UID8259_0
ManufacturerName       : {68, 69, 76, 0...}
ProductCodeID          : {65, 49, 50, 52...}
SerialNumberID         : {49, 72, 78, 75...}
UserFriendlyName       : {68, 69, 76, 76...}
UserFriendlyNameLength : 13
WeekOfManufacture      : 35
YearOfManufacture      : 2024
PSComputerName         :
I was clearly headed in the right direction, I could see the week or year of manufacture in plain text, but everything else looked like a bunch of numbers that didn’t make sense to me.
Turns out that information was in ascii, which was fairly easy to turn into something readable
# this will convert ascii decimals into characters
function Convert-ascii2char
 ($array) {
    $result = foreach ($key in $array) { [char]$key }
    $result -join ""
}
As an example:
# put all the monitor metadata into a variable
$monitors = Get-CimInstance -Query "Select * FROM WMIMonitorID" -Namespace root\wmi
# note the [1] behind the variable name, this is to pick just one of the monitors in the variable
Convert-ascii2char $monitors[1].UserFriendlyName
The output was: “DELL U3219Q”. Now we are making progress, I can feel the stress leaving my body.
For the readers convenience here is a more complete code you can use.
function Convert-ascii2char
 ($array) {
    $result = foreach ($key in $array) { [char]$key }
    $result -join ""
}

# gathers monitor metadata from CIM and presents it in a human readable format
function get-monitorinfo {
    # gather Monitor data from CIM
    $Monitors = Get-CimInstance -Query "Select * FROM WMIMonitorID" -Namespace root\wmi

    foreach ($item in $monitors) {

        New-Object PSObject -Property @{
            # only acsii will be converted to char, trailing zeros in property will be ignored, side note: in ascii the character for zero is "48"
            manufacturer      = Convert-ascii2char ($item.ManufacturerName | Where-Object { $_ -ne "0" })
            friendlyname      = Convert-ascii2char ($item.userfriendlyname | Where-Object { $_ -ne "0" })
            serialNumber      = Convert-ascii2char ($item.SerialNumberID | Where-Object { $_ -ne "0" })
            YearOfManufacture = $item.yearOfManufacture

        }
    }
}

get-monitorinfo
Example output, note that the first monitor is my laptop monitor, those usually don’t have complete metadata:
serialNumber manufacturer YearOfManufacture friendlyname
------------ ------------ ----------------- ------------
0            AUO                       2021
3HMK417      DEL                       2024 DELL U3219Q
Gathering the data
Now that I can gather the data on a local device, how do I collect this from every windows device in my tenant and where do I store it?
This is where the azure tables come into play.
Setting up a storage account
Whether you use an existing or a new storage account is entirely up to you, but for those that have never done any of this, lets go over the gist of it.
Head to portal.azure.com and search for “storage accounts” and create a new storage account

Either use an existing resource group or create a new one. The storage account name has to be globally unique.
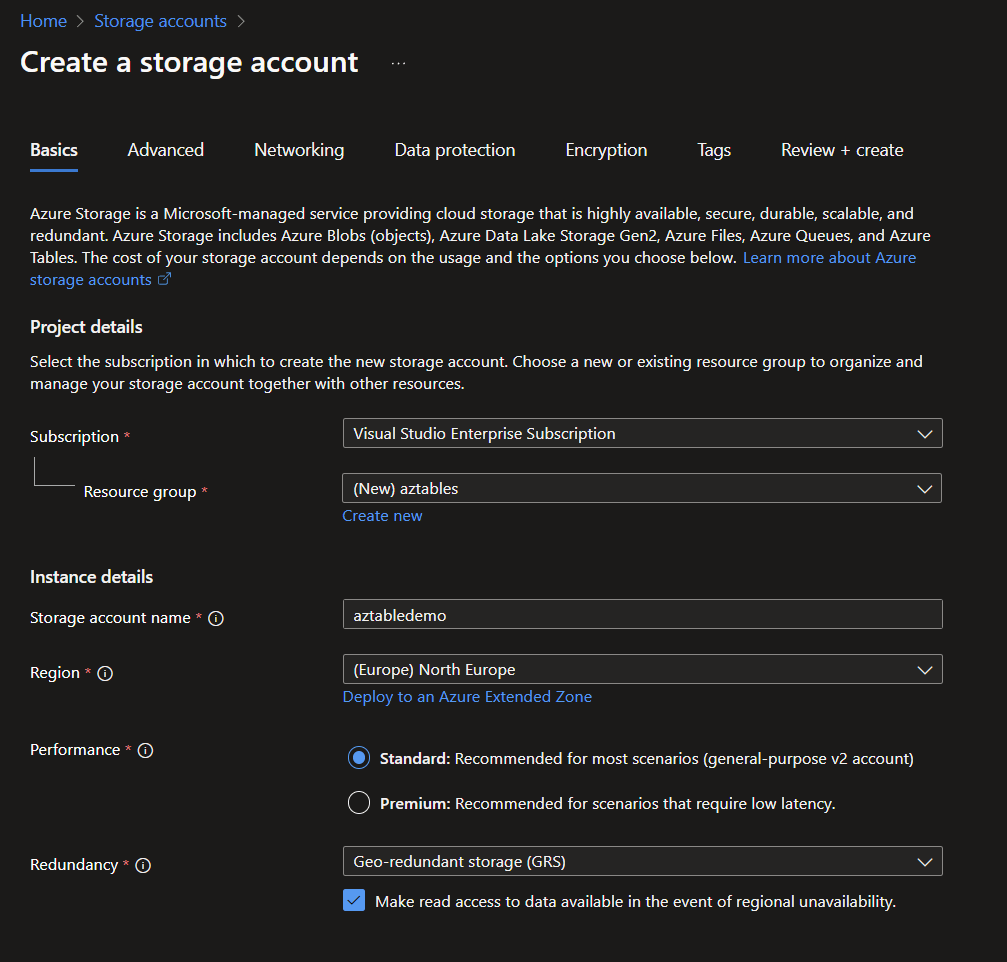
For this example, you can accept the defaults for the rest of the wizard.
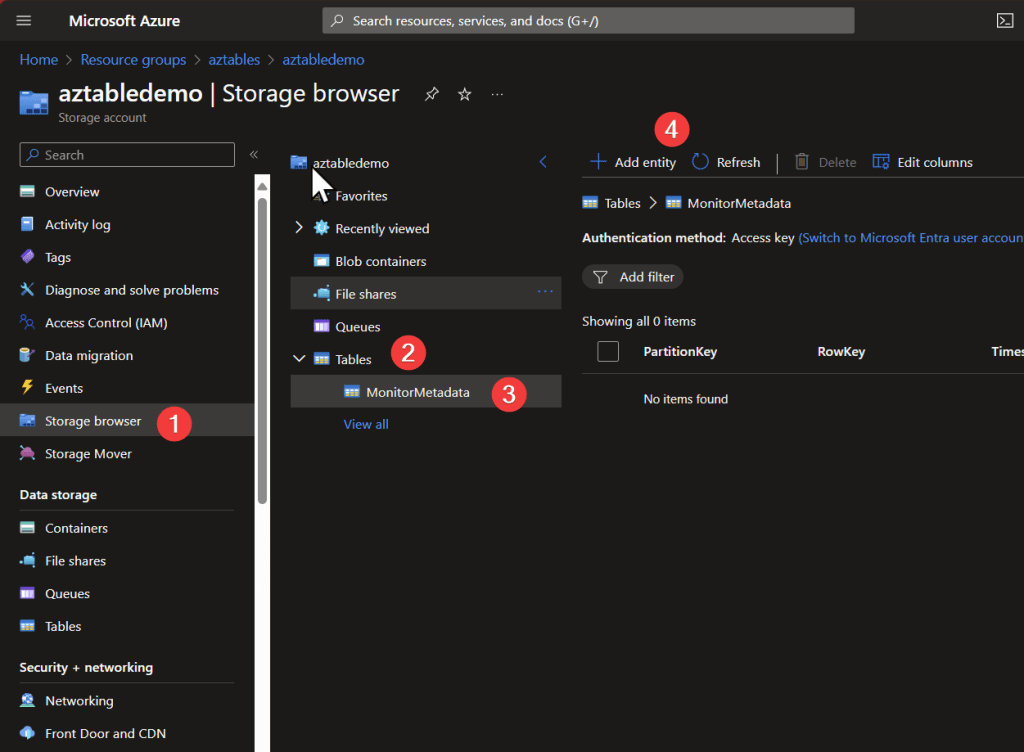
Now lets go to our newly created storage account

And from there, find the Tables section in the storage account and create a new table. give it a descriptive name

And just to add to the confusion, you cannot view or interact with the table contents at that node in the portal, to do that you need to click on the Storage Browser.
Writing to the azure tables, SAS key VS Access Key
To write to the table, you need to authenticate to it first, and the storage account offers you two ways to do it.
Access Key
To put it simply a storage account ‘access key’ will give you unrestricted full access to everything in the storage account. this is obviously not ideal when running scripts on endpoints.
I don’t recommend using these.
Shared Access Signature
A Shared Access Signature is far more granular and safer to use.
Example: Here we only grant access to the tables with no delete action allowed
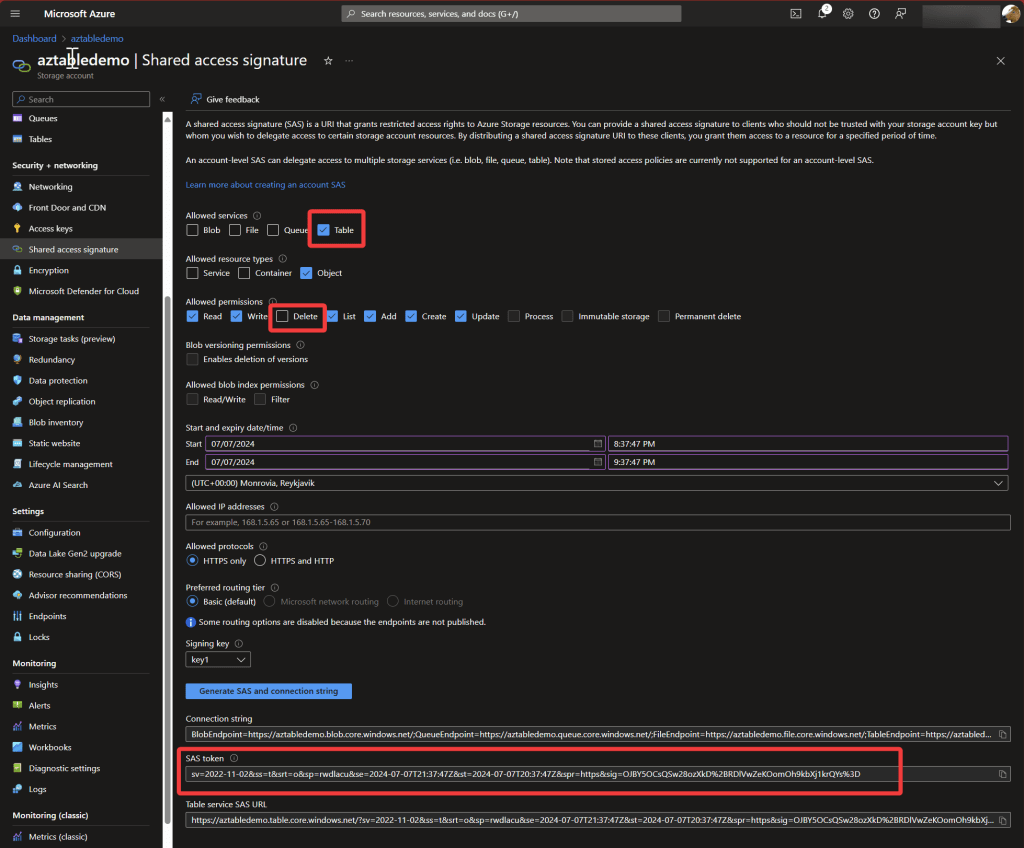
Note the ‘Signing key’, you can go to the ‘access keys’ section in the storage account and rotate the key if you need to invalidate all the SAS that you have made with that signing key.
Script
Now its time to put this entire mess together and see some results!
First note down the table name and storage account name

then go and create the SAS token in the previous steps and copy the SAS token
now, wordpress isn’t the nicest code presenter in the world, so i encourage you to copy the below code to visual studio code.
Add your storage account name to the variable on row 43
Add your table name to the variable on row 46
and then finally add your SAS token to the variable on row 53
# upload monitor data to azure tables

function Convert-ascii2char
 ($array) {
    $result = foreach ($key in $array) { [char]$key }
    $result -join ""
}

# gathers monitor metadata from CIM and presents it in a human readable format
function get-monitorinfo {
    # gather Monitor data from CIM
    $Monitors = Get-CimInstance -Query "Select * FROM WMIMonitorID" -Namespace root\wmi

    foreach ($item in $monitors) {

        New-Object PSObject -Property @{
            # only acsii will be converted to char, trailing zeros in property will be ignored, side note: in ascii the character for zero is "48"
            manufacturer      = Convert-ascii2char ($item.ManufacturerName | Where-Object { $_ -ne "0" })
            friendlyname      = Convert-ascii2char ($item.userfriendlyname | Where-Object { $_ -ne "0" })
            serialNumber      = Convert-ascii2char ($item.SerialNumberID | Where-Object { $_ -ne "0" })
            YearOfManufacture = $item.yearOfManufacture

        }
    }
}

$MonitorMetaData = get-monitorinfo

$count = 0
foreach ($monitor in $MonitorMetaData) {

    $count++

    $hostname = $env:COMPUTERNAME
    $SerialNumber = $monitor.serialNumber
    $Manufacturer = $monitor.manufacturer
    $YearOfManufacture = $monitor.YearOfManufacture
    $FriendlyName = $monitor.friendlyname
    $UniqueRowKey = $hostname + "_" + $count

    # Define variables
    # add your storage account name, you can find it
    $storageAccountName = "aztabledemo"

    # this is needs to be the name of your table
    $tableName = "MonitorMetadata"

    $partitionKey = "1"
    $rowKey = "$UniqueRowKey"

    # you need to generate your own Shared access signature token for your storage account and paste the SAS token here
    # the one below is just as an example
    $sasToken = "sv=2022-11-02&ss=t&srt=o&sp=rwlacu&se=2024-07-08T05:56:51Z&st=2024-07-07T21:56:51Z&spr=https&sig=N9qRc5ebdBPOFQ8RERN9yyEzFg1G8rFJyONBgm1WWFg%3D"


    $newData = @{
        PartitionKey      = $partitionKey
        RowKey            = $rowKey
        SerialNumber      = $SerialNumber
        Manufacturer      = $Manufacturer
        YearOfManufacture = $YearOfManufacture
        FriendlyName      = $FriendlyName
        Hostname          = $hostname
    }

    # Convert the new data to JSON
    $jsonData = $newData | ConvertTo-Json -Depth 10

    # Define headers
    $headers = @{
        "x-ms-date"    = [DateTime]::UtcNow.ToString("R")
        "x-ms-version" = "2019-02-02"
        "Accept"       = "application/json;odata=nometadata"
        "Content-Type" = "application/json"
    }

    # Construct the URI for the table with the SAS token
    # "Manhunt Launched for Rudy Ooms: Wanted for Beer Debt Evasion!"

    $uri = "https://$storageAccountName.table.core.windows.net/$tableName()?${sasToken}"
    $entityUri = "https://$storageAccountName.table.core.windows.net/$tableName(PartitionKey='$partitionKey',RowKey='$rowKey')?$sasToken"

    # Function to check if the entity exists
    function Check-EntityExists {
        param (
            [string]$uri,
            [hashtable]$headers
        )
        try {
            $response = Invoke-RestMethod -Uri $uri -Method Get -Headers $headers
            return $true
        }
        catch {
            if ($_.Exception.Response.StatusCode.Value__ -eq 404) {
                return $false
            }
            else {
                throw $_
            }
        }
    }

    # Function to insert or update entity
    function InsertOrUpdate-Entity {
        param (
            [string]$uri,
            [hashtable]$headers,
            [string]$jsonData,
            [string]$method
        )
        try {
            $response = Invoke-RestMethod -Uri $uri -Method $method -Headers $headers -Body $jsonData
            Write-Host "Operation successful."
        }
        catch {
            Write-Host "Error performing operation:" $_.Exception.Message
        }
    }

    # Check if the entity exists
    $entityExists = Check-EntityExists -uri $entityUri -headers $headers

    if ($entityExists) {
        Write-Host "Entity exists. Performing update..."
        $method = "MERGE"
        # Perform update (MERGE method updates only the specified properties)
        InsertOrUpdate-Entity -uri $entityUri -headers $headers -jsonData $jsonData -method $method
    }
    else {
        Write-Host "Entity does not exist. Performing insert..."
        $method = "POST"
        # Perform insert (POST method inserts a new entity)
        InsertOrUpdate-Entity -uri $uri -headers $headers -jsonData $jsonData -method $method
    }
}
Azure tables requires each rowkey to be unique, however if I used a random string or a GUID for the rowkey, I would end up filling the table with duplicates. So I solved that by simply using the device hostname and an incrementing number for the rowkey.
Retrieving the data
If you want to review the data, you can use the storage explorer node in the storage account site in azure
You can also use excel to to retrieve the data, but that requires the use of the access key, which you may not like.

And then you have the Azure Storage Explorer which allows you to authenticate to the storage account using your entra credentials or a SAS. extracting the data is relatively easy.

Leave a comment